Custom Soundwave

Another Custom figure. This is Cybertronian Soundwave from Hasbro's War for Cybertron line. This figure is based off the character design from the Transformers game War for Cybertron. Basically a complete repaint of the figure. I've also added a few blast/bullet marks on the top/front of the vehicle mode.


Here's the original figure in vehicle mode before my customizing. Photo from www.seibertron.com.

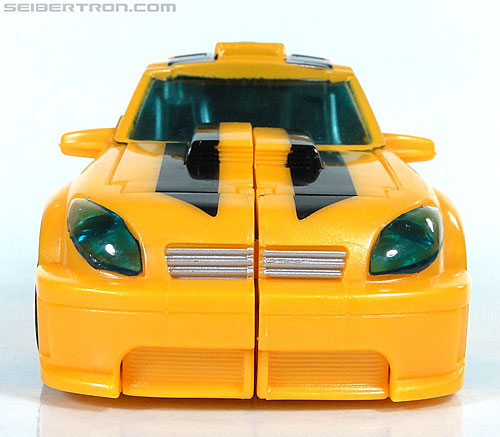
Vehicle mode front view. All the blue sections were painted with a darker blue than what the plastic was and some splotchy dirt/grime marks were added. The silver sections were painted in black first and then dry-brushed with silver for a worn metal look. I also added a bit of copper for more detail. In this front view, you can easily see the blast marks that were added to the front of the vehicle mode with an Exacto knife.


I also painted a few of the purple sections with glow-in-the-dark paint made by a company called CoolGlow. They actually make different colored glow-in-the-dark paint so not everything has to glow green. :) On this figure, the paint is clear in daylight and purple when glowing in the dark. Unfortunately, this had to be painted over the Decepticon symbol on the screen, so that was replaced with a decal from www.reprolabels.com.


Front angle view.

Glow in the dark front angle.


Side view. I painted the purple on the tires, but due to how thick the glow paint needs to be in order to see it glowing I have not added any glow to them.

But the two stripes glow.


Back angle view.

Glow in the dark back angle. Here you can see the tail lights.

Original figure back view. Photo from www.seibertron.com.


Back view. The grated sections were previously unpainted blue plastic, so I painted them silver for a more game accurate look.

Other side. Same details.

Top view. The silver grated section in the middle of the blue roof was added by myself for a more accurate look (previously unpainted blue plastic). You can also see the battle damage added to the top of the vehicle mode near the front.

Bottom view. Here some robot details can be seen such as the upper legs.

Original figure in robot mode before customization. Photo from www.seibertron.com.
And finally, robot mode! Same paint detailing as mentioned above except for the silver side face vents and red stripes on his forearms. Those were added to give him more of an original G1 Transformers look. He is pictured here with both his shoulder mounted rocket launcher and hand gun.


So here's the glowing chest and knees.

Right side.

Back view. The damaged areas from the top of the vehicle mode are now on the back of the shoulders.

Left side.
Normal 360˚ view.

Glow in the dark 360˚ view.

Back to vehicle mode... Soundwave's chest cavity/hood opens to house his weapons. This is similar to his G1 form in which he transformed into a cassette player.

Now this isn't an official transformation, but I've seen it done by many different people. This is a third mode that somewhat resembles a cassette player. Since Soundwave transformed into a cassette player back in 1984, I'm glad that this figure is able to do this, even if he's not supposed to. 

And again, he still glows.

Here's a view of his back so you can see how he's able to stand in this mode. If you flip the front wheels back, they act as substitute legs.

"Bumble Bee"

Brand new custom here! This is Bumble Bee from the Transformers Reveal the Shield series. I've added all the grime and dust as well as a few bullet/blast marks around his body. I also used an ink stylus and Brick Red India Ink to outline all the contour detail on him. This is most easily seen on the sides of the door panels (arm panels). The black sections of his legs, arms, and body have also gotten a dry brushing of darkened silver for a more worn metallic look.

Vehicle Mode
Vehicle mode. Here you can see the bullet/blast marks on the side door panel and some dirt/dust around the wheels.

Comparative image to the next one. This is before the added details. (image from www.seibertron.com)

Front view. Straight on view of the front bumper damage. I also painted the lower silver grated area which was previously unpainted yellow plastic.

Another comparison. Here's a side view before the added details. (image from www.seibertron.com)

Side view. Here you can see the bullet/blast marks on the side door panel and some dirt/dust around the wheels.

Back view. No damage was added here, but you can see the India Ink outlining on the rear bumper and trunk.

I have also added a license plate. It was made in Photoshop and then printed on an adhesive label. After placing it, I covered it with a sheet of clear styrene to protect it. I've also painted the side view mirrors silver (previously unpainted yellow plastic).

Top view. Here, you can see the two blast marks near the rear of the vehicle and on the sides of the hood.

Bottom view. Here you can see a few robot sections, but the main focus is the front section which I painted in with black and then dry brushed over with darkened silver and copper. This section was previously unpainted yellow plastic. You can also see the added dirt effect in the crevasses of the wheels.

Robot Mode

Here's the original before customization. (image from www.seibertron.com)

Front view. Not much damage detail on the front of the figure, except for a bit on his toe area. However, the India Ink outlining can be seen on his face, upper legs, and arm details.

Right side. Here it is easy to see the two bullet/blast marks on his arm panel as well as a few on the upper side of his foot.


Back side. Here you can see two bullet/blast marks on his upper back. The brown line detail on the back of his feet is the India Ink.

Left side. Three bullet/blast marks on his arm panel and two on his foot.


This figure's weapon was quite poor (a jet ski that transformed into a jetpack) so I made my own. This gun was made out of two plastic caps, plastic grooves from the underside of a milk bottle cap, and a Lego jetpack. The handle is a piece of plastic silly straw.

Front view.


Bumble Bee inspects his new weapon.

Action pose.

Updated "Kup"

This is an update for my custom Sergeant Kup figure from the Transformers Generations series by Hasbro. I've added a few bullet/blast holes on this guy to give him some actual "battle damage". All bullet/blast damage was created with an exacto knife and then painted.

Front view of robot mode. I've added a few nicks on the sides of his shin area as well as a couple bullet holes/indents in his side chest plates.

Here's a close up of the chest damage. You can see one bullet hole on the lower right side, and another with cracks on the upper left side.

Right side. Here you can see the damage added to his arm guard and side leg panel.


Back side. Here, the only real damage was added to his upper back panel.
Here's a close up of the back panel with the three new bullet marks.

Left side. Here you can see the damage added to his arm guard and side leg panel.

Being that this is a Transformer, the vehicle mode has the same damage effects. But this will show how it translates to this new form. Side view with bullet damage on the door panel.

Front view. Bullet/blast damage to the hood and roof.

Side view with bullet damage on the door panel and near the rear tire.

Back view. Just a few scratches between the tail lights.

Kup with added decals from Reprolabels.com. License plate, side view mirrors, and back windshield.